
Debian Package management tool dpkg is a low level tool which runs only Debian based Linux distributions. dpkg is used to search, install, remove, purge, unpack etc. the debian package.
In this blog we are going to covers the basics of creating custom .deb packages and managing them with dpkg and apt.
We will also cover the process of creating your own deb package using dpkg-deb tool and install it using dpkg and apt.
This blog is for those peoples who are interested in learning the basics of creating and managing packages in Debian based distributions.
A .deb file is a Debian package. The dpkg tool is the Debian package manager and apt is a higher level tool for managing packages which uses dpkg internally.
Now lets go to play with dpkg-deb
Create a package
Now, we are going to create a simple debian package of jenkins.war file (you can download it from here) as a systemd service.
STEP-1
First, we have to create a new directory with any name eg. myfirstdebpkg. This directory will store all the package contents like package metadata ,binaries, configuration file, log files etc.
Inside the project directory we have to create a special directory name as DEBIAN with one special file inside it which name is control without any extention.
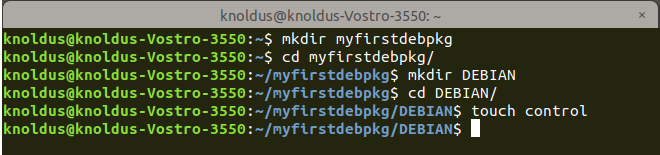
Tree Structure of the directory:
myfirstdebpkg

└── DEBIAN

    └── control

1 directory, 1 file
STEP-2
The next step is to define the metadata of the project in the control file.
Package: myfirstdebpkg
Version: 1.0
Section: base
Priority: optional
Architecture: all
Depends: openjdk-8-jdk
Maintainer: azmathasan92@gmail.com
Description: run jenkins.war as a service.
These are the important fields in the control file of the package:
Package: Identifies the package name

Version: Version of the package

Section: This field specifies an application area into which the package has been classified.Eg debug, devel, doc, editors, education, electronics, embedded, fonts, gamesetc

Priority: You can set the priority of the package, we have these types: required, important, important, optional, extra

Architecture: You can define the architecture of the application (amd64 ,i386 etc).

Depends: If your package is depends on other package you will mention here, if you install this package from high level tool (apt, aptitude) then it will automatically download its dependencies.

Maintainer: who maintains this package

Description: Description of the package
We have created a minimal directory structure of the debian package and we have written control file.
STEP-3
Now, copy our jenkins.war file to the /opt/jenkins/ directory of the package, first we create the directory opt/jenkins directory in the myfirstdebpkg directory , see below

myfirstdebpkg/
 ├── DEBIAN
 │   └── control
 └── opt
     └── jenkins
         └── jenkins.war

 3 directories, 2 files
Now, we are going to write the systemd service unit script to run jenkins.war as a service named jenkins.service file.
 Unit]
 Description=Jenkins Daemon service
 [Service]
 ExecStart=/usr/bin/java -jar /opt/jenkins/jenkins.war --logfile=/var/log/jenkins.log
 SuccessExitStatus=143
 User=knoldus
 [Install]
 WantedBy=multi-user.target
In the above file we create a service unit for the package to run this package as a service and we can control this service using the systemctl tool, we can start, stop, status, enable, disable or check logs of the package.
Example : sudo systemctl status jenkins.
Place this file to the /etc/systemd/system/ directory, we need to create these directories in our package.

 /home/knoldus/myfirstdebpkg/
 ├── DEBIAN
 │   └── control
 ├── etc
 │   └── systemd
 │       └── system
 │           └── jenkins.service
 └── opt
     └── jenkins
         └── jenkins.war

 6 directories, 3 files
We have mentioned the logging location i.e /var/log/jenkins.log in the jenkins.service file, we have to manage the logs in the /var/log/jenkins.log. We have to create the directories and jenkins.log blank file in the root of the package.

/home/knoldus/myfirstdebpkg/
├── DEBIAN
│ └── control
├── etc
│ └── systemd
│ └── system
│ └── jenkins.service
├── opt
│ └── jenkins
│ └── jenkins.war
└── var
└── log
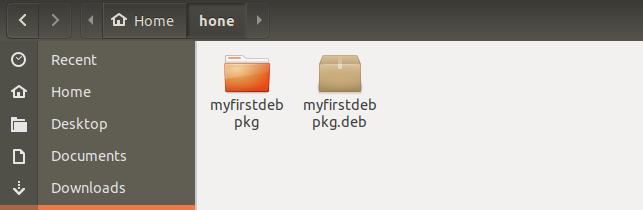
└── jenkins.logCongratulations, you have successfully created a debian package structure, now we are going to build a debian package from the package structure using dpkg-deb tool:

After dpkg-deb –build operation, it will created a debian package with the .deb extention, you can see in the image below:
you have created your own debain package, now times to install it.
You can install the debian package using the dpkg or apt package management tool.

or you can install using apt
sudo apt install ./myfirstdebpkg.debCheck the status of the installed service which name as jenkins.service

Initially this is inactive, you can start the service using :

Now, your package is running as a daemon service you can start , stop or check status or the package using:
sudo systemctl start jenkins
sudo systemctl stop jenkins
sudo systemctl status jenkins
sudo systemctl restart jenkins
You can remove this package with dpkg tool
sudo dpkg --remove myfirstdebpkg  //remove application but not configuration files
sudo dpkg --purge myfirstdebpkg   //complete unistall the application with all files
That’s all for now, I will follow it up with more knowledge on this topic next time.